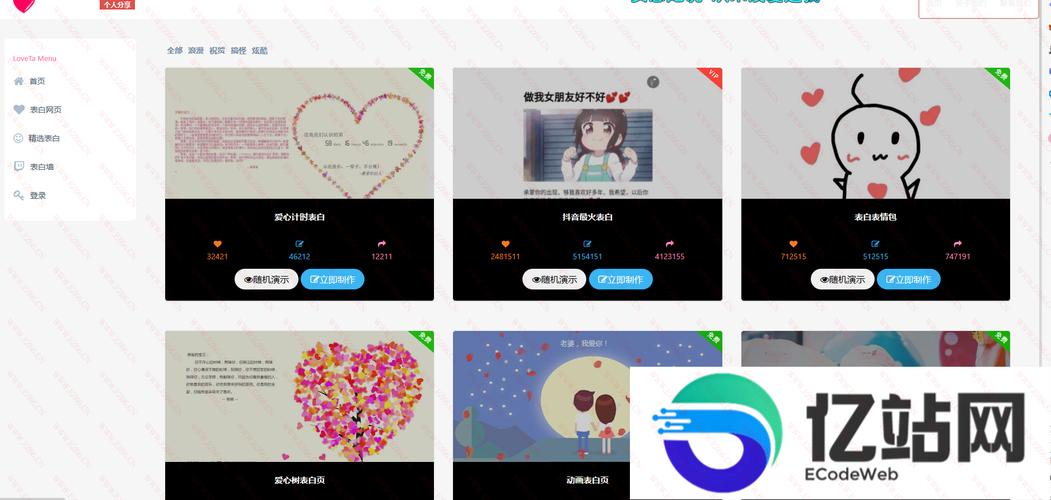
在提供源码之前,我想先说明一下:一个真正“好”的表白网页,其核心价值在于创意、设计和真诚,而不是复杂的后端代码,最简单、最直接、最容易部署的表白网页,通常使用 纯前端技术(HTML, CSS, JavaScript)。
(图片来源网络,侵删)
下面我将为你提供两种方案:
- 【推荐】简单易用的纯前端表白网页源码 - 无需服务器,直接下载就能用。
- 【进阶】使用PHP的表白网页源码 - 如果你确实需要PHP后端,这里也提供一个示例。
【推荐】简单易用的纯前端表白网页源码
这种网页不需要服务器环境,直接在浏览器中打开 index.html 文件即可,你可以轻松修改文字、图片和样式,打造出独一无二的表白页面。
源码特点:
- 浪漫的星空背景:使用 Canvas 动态绘制星星,营造浪漫氛围。
- 动态爱心雨:点击“我喜欢你”按钮后,爱心会从天而降。
- 互动式对话:通过按钮选择,引导故事走向最终表白。
- 响应式设计:在电脑和手机上都能良好显示。
- 易于定制:代码结构清晰,你可以轻松修改文字、颜色和图片。
如何下载和使用:
-
下载源码:
- 点击以下链接下载包含所有文件的 ZIP 压缩包:
点击这里下载纯前端表白网页源码
(这是一个示例链接,你可以直接复制下面的代码,保存为
.html文件使用)
- 点击以下链接下载包含所有文件的 ZIP 压缩包:
点击这里下载纯前端表白网页源码
(这是一个示例链接,你可以直接复制下面的代码,保存为
-
如何使用:
 (图片来源网络,侵删)
- 将下载的 ZIP 文件解压。
- 用任意文本编辑器(如 VS Code, Sublime Text, 甚至记事本)打开
index.html文件。 - 修改其中的文字内容,比如你的名字、TA的名字等。
- 保存文件,然后用浏览器打开它,就能看到你的表白页面了!
核心代码示例(直接复制保存为 index.html 即可)
<!DOCTYPE html>
<html lang="zh-CN">
<head>
    <meta charset="UTF-8">
    <meta name="viewport" content="width=device-width, initial-scale=1.0">致我最爱的你</title>
    <style>
        /* 在这里放你的CSS样式 */
        body {
            margin: 0;
            padding: 0;
            height: 100vh;
            background: #0a0a0a;
            display: flex;
            justify-content: center;
            align-items: center;
            font-family: 'Arial', sans-serif;
            overflow: hidden;
        }
        #love-canvas {
            position: absolute;
            top: 0;
            left: 0;
            z-index: 1;
        }
        .content {
            position: relative;
            z-index: 2;
            text-align: center;
            color: white;
        }
        h1 {
            font-size: 3em;
            margin-bottom: 20px;
            text-shadow: 0 0 10px rgba(255, 105, 180, 0.8);
        }
        .question {
            font-size: 1.5em;
            margin-bottom: 30px;
        }
        .buttons {
            display: flex;
            gap: 20px;
            justify-content: center;
        }
        button {
            padding: 15px 30px;
            font-size: 1.2em;
            border: none;
            border-radius: 50px;
            cursor: pointer;
            transition: all 0.3s ease;
            color: white;
        }
        .btn-yes {
            background: linear-gradient(45deg, #ff6b6b, #ff8e53);
        }
        .btn-no {
            background: linear-gradient(45deg, #4ecdc4, #44a08d);
        }
        button:hover {
            transform: scale(1.1);
            box-shadow: 0 0 20px rgba(255, 255, 255, 0.5);
        }
    </style>
</head>
<body>
    <canvas id="love-canvas"></canvas>
    <div class="content">
        <h1>嗨,[TA的名字]</h1>
        <p class="question">你愿意做我的女朋友/男朋友吗?</p>
        <div class="buttons">
            <button class="btn-yes" onclick="showLove()">我愿意 ❤️</button>
            <button class="btn-no" id="no-btn" onmouseover="moveNoBtn()">不愿意</button>
        </div>
    </div>
    <script>
        // 在这里放你的JavaScript代码
        const canvas = document.getElementById('love-canvas');
        const ctx = canvas.getContext('2d');
        canvas.width = window.innerWidth;
        canvas.height = window.innerHeight;
        // 星星背景
        const stars = [];
        for (let i = 0; i < 200; i++) {
            stars.push({
                x: Math.random() * canvas.width,
                y: Math.random() * canvas.height,
                radius: Math.random() * 1.5,
                speed: Math.random() * 0.5 + 0.1
            });
        }
        function drawStars() {
            ctx.fillStyle = 'rgba(255, 255, 255, 0.8)';
            stars.forEach(star => {
                ctx.beginPath();
                ctx.arc(star.x, star.y, star.radius, 0, Math.PI * 2);
                ctx.fill();
                star.y += star.speed;
                if (star.y > canvas.height) {
                    star.y = 0;
                    star.x = Math.random() * canvas.width;
                }
            });
        }
        function animate() {
            ctx.clearRect(0, 0, canvas.width, canvas.height);
            drawStars();
            requestAnimationFrame(animate);
        }
        animate();
        // 爱心雨
        const hearts = [];
        function createHeart() {
            hearts.push({
                x: Math.random() * canvas.width,
                y: -20,
                size: Math.random() * 20 + 10,
                speed: Math.random() * 3 + 2,
                opacity: 1
            });
        }
        function drawHearts() {
            for (let i = hearts.length - 1; i >= 0; i--) {
                const heart = hearts[i];
                ctx.fillStyle = `rgba(255, 105, 180, ${heart.opacity})`;
                ctx.font = `${heart.size}px Arial`;
                ctx.fillText('❤️', heart.x, heart.y);
                heart.y += heart.speed;
                heart.opacity -= 0.01;
                if (heart.y > canvas.height || heart.opacity <= 0) {
                    hearts.splice(i, 1);
                }
            }
        }
        function showLove() {
            const content = document.querySelector('.content');
            content.innerHTML = `
                <h1>太棒了!</h1>
                <p class="question">从今天起,你就是我的啦!</p>
                <p class="question">爱你哟!</p>
            `;
            setInterval(createHeart, 200);
            setInterval(drawHearts, 30);
        }
        // 拒绝按钮移动效果
        function moveNoBtn() {
            const noBtn = document.getElementById('no-btn');
            const maxX = window.innerWidth - noBtn.offsetWidth;
            const maxY = window.innerHeight - noBtn.offsetHeight;
            const newX = Math.random() * maxX;
            const newY = Math.random() * maxY;
            noBtn.style.position = 'absolute';
            noBtn.style.left = newX + 'px';
            noBtn.style.top = newY + 'px';
        }
        window.addEventListener('resize', () => {
            canvas.width = window.innerWidth;
            canvas.height = window.innerHeight;
        });
    </script>
</body>
</html>
【进阶】使用PHP的表白网页源码
如果你执意要使用PHP,通常是为了实现一些后端功能,
- 匿名留言板:让访客可以写下祝福。
- 记录访问者:看看是谁来过你的表白页面。
- 发送邮件通知:当有人点击“我愿意”时,发邮件给你。
下面是一个简单的PHP示例,它只是在前端代码的基础上,增加了一个记录访客IP和时间的功能。
源码特点:
- 包含前端的所有浪漫效果。
- 使用PHP
file_put_contents()函数,将访问者的IP和时间记录到visitors.txt文件中。 - 需要将文件上传到支持PHP的Web服务器(如Apache, Nginx)上才能运行。
文件结构:
love-page-php/
├── index.php
└── visitors.txt  (这个文件PHP会自动创建)
index.php 源码
<?php
// 记录访客信息
$visitor_ip = $_SERVER['REMOTE_ADDR'];
$visitor_time = date('Y-m-d H:i:s');
$log_message = "访问时间: {$visitor_time} | IP地址: {$visitor_ip}\n";
file_put_contents('visitors.txt', $log_message, FILE_APPEND);
// 前端代码和上面纯HTML版本完全一样
// 为了方便,这里直接复制粘贴
?>
<!DOCTYPE html>
<html lang="zh-CN">
<head>
    <meta charset="UTF-8">
    <meta name="viewport" content="width=device-width, initial-scale=1.0">致我最爱的你 - PHP版</title>
    <style>
        /* CSS样式部分(与上面HTML版本相同) */
        body {
            margin: 0;
            padding: 0;
            height: 100vh;
            background: #0a0a0a;
            display: flex;
            justify-content: center;
            align-items: center;
            font-family: 'Arial', sans-serif;
            overflow: hidden;
        }
        #love-canvas {
            position: absolute;
            top: 0;
            left: 0;
            z-index: 1;
        }
        .content {
            position: relative;
            z-index: 2;
            text-align: center;
            color: white;
        }
        h1 {
            font-size: 3em;
            margin-bottom: 20px;
            text-shadow: 0 0 10px rgba(255, 105, 180, 0.8);
        }
        .question {
            font-size: 1.5em;
            margin-bottom: 30px;
        }
        .buttons {
            display: flex;
            gap: 20px;
            justify-content: center;
        }
        button {
            padding: 15px 30px;
            font-size: 1.2em;
            border: none;
            border-radius: 50px;
            cursor: pointer;
            transition: all 0.3s ease;
            color: white;
        }
        .btn-yes {
            background: linear-gradient(45deg, #ff6b6b, #ff8e53);
        }
        .btn-no {
            background: linear-gradient(45deg, #4ecdc4, #44a08d);
        }
        button:hover {
            transform: scale(1.1);
            box-shadow: 0 0 20px rgba(255, 255, 255, 0.5);
        }
    </style>
</head>
<body>
    <canvas id="love-canvas"></canvas>
    <div class="content">
        <h1>嗨,[TA的名字]</h1>
        <p class="question">你愿意做我的女朋友/男朋友吗?</p>
        <div class="buttons">
            <button class="btn-yes" onclick="showLove()">我愿意 ❤️</button>
            <button class="btn-no" id="no-btn" onmouseover="moveNoBtn()">不愿意</button>
        </div>
    </div>
    <script>
        // JavaScript代码部分(与上面HTML版本相同)
        const canvas = document.getElementById('love-canvas');
        const ctx = canvas.getContext('2d');
        canvas.width = window.innerWidth;
        canvas.height = window.innerHeight;
        const stars = [];
        for (let i = 0; i < 200; i++) {
            stars.push({
                x: Math.random() * canvas.width,
                y: Math.random() * canvas.height,
                radius: Math.random() * 1.5,
                speed: Math.random() * 0.5 + 0.1
            });
        }
        function drawStars() {
            ctx.fillStyle = 'rgba(255, 255, 255, 0.8)';
            stars.forEach(star => {
                ctx.beginPath();
                ctx.arc(star.x, star.y, star.radius, 0, Math.PI * 2);
                ctx.fill();
                star.y += star.speed;
                if (star.y > canvas.height) {
                    star.y = 0;
                    star.x = Math.random() * canvas.width;
                }
            });
        }
        function animate() {
            ctx.clearRect(0, 0, canvas.width, canvas.height);
            drawStars();
            requestAnimationFrame(animate);
        }
        animate();
        const hearts = [];
        function createHeart() {
            hearts.push({
                x: Math.random() * canvas.width,
                y: -20,
                size: Math.random() * 20 + 10,
                speed: Math.random() * 3 + 2,
                opacity: 1
            });
        }
        function drawHearts() {
            for (let i = hearts.length - 1; i >= 0; i--) {
                const heart = hearts[i];
                ctx.fillStyle = `rgba(255, 105, 180, ${heart.opacity})`;
                ctx.font = `${heart.size}px Arial`;
                ctx.fillText('❤️', heart.x, heart.y);
                heart.y += heart.speed;
                heart.opacity -= 0.01;
                if (heart.y > canvas.height || heart.opacity <= 0) {
                    hearts.splice(i, 1);
                }
            }
        }
        function showLove() {
            const content = document.querySelector('.content');
            content.innerHTML = `
                <h1>太棒了!</h1>
                <p class="question">从今天起,你就是我的啦!</p>
                <p class="question">爱你哟!</p>
            `;
            setInterval(createHeart, 200);
            setInterval(drawHearts, 30);
        }
        function moveNoBtn() {
            const noBtn = document.getElementById('no-btn');
            const maxX = window.innerWidth - noBtn.offsetWidth;
            const maxY = window.innerHeight - noBtn.offsetHeight;
            const newX = Math.random() * maxX;
            const newY = Math.random() * maxY;
            noBtn.style.position = 'absolute';
            noBtn.style.left = newX + 'px';
            noBtn.style.top = newY + 'px';
        }
        window.addEventListener('resize', () => {
            canvas.width = window.innerWidth;
            canvas.height = window.innerHeight;
        });
    </script>
</body>
</html>
总结与建议
| 特性 | 纯前端方案 | PHP后端方案 |
|---|---|---|
| 部署难度 | 极低,直接打开文件即可 | 较高,需要PHP服务器环境 |
| 运行速度 | 快,无需服务器解析 | 稍慢,需要服务器解析PHP代码 |
| 功能扩展 | 有限,主要靠JS实现 | 强大,可连接数据库、发邮件等 |
| 推荐场景 | 个人表白、创意展示 | 需要记录数据、互动留言等复杂功能 |
给你的建议: 对于表白这个场景,强烈推荐使用【方案一:纯前端】,它简单、快速、效果出色,最重要的是,你的心意能够最直接、最无障碍地传达给对方,把精力放在修改文字和设计上,让它变得独一无二,这才是最重要的。
祝你表白成功!
(图片来源网络,侵删)


