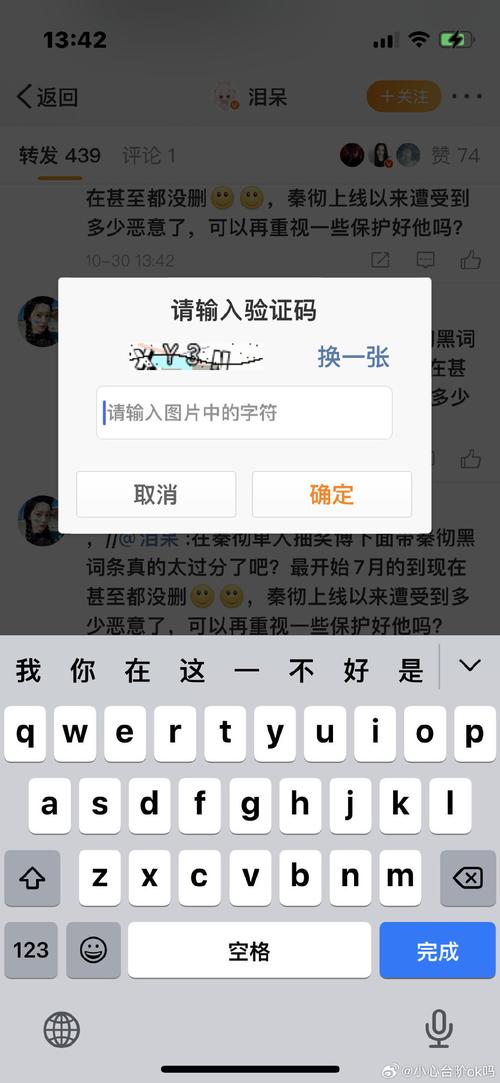
- 验证码的有效期:用户获取验证码后,这个码在多长时间内有效。
- 发送验证码后的冷却时间:用户点击“发送验证码”按钮后,按钮需要等多长时间才能再次点击,以防止频繁发送。
这两种情况都涉及到一个随机时间 rand,我们分别来看如何实现和修改。
(图片来源网络,侵删)
修改验证码的有效期
这是指用户在获取验证码后,必须在规定的时间内(例如5分钟)内输入,否则验证码将失效。
这个逻辑通常在后端实现,因为验证码的验证和存储都在服务器端,但前端也需要根据后端返回的信息来提示用户。
后端实现 (以 Node.js + Express 为例)
后端在生成验证码时,会设置一个过期时间。
// 假设使用 express 和 express-session
const express = require('express');
const session = require('express-session');
const crypto = require('crypto'); // Node.js 内置的加密模块
const app = express();
app.use(express.json());
app.use(session({
  secret: 'your-secret-key',
  resave: false,
  saveUninitialized: true,
  cookie: { maxAge: 60000 } // session cookie 的有效期
}));
// 发送验证码的 API
app.post('/api/send-code', (req, res) => {
  const phoneNumber = req.body.phone;
  const code = Math.floor(100000 + Math.random() * 900000).toString(); // 生成6位随机码
  // --- 关键部分:设置有效期 ---
  // 有效期为 5 分钟 (300秒)
  const expireTime = 300;
  // 创建一个包含验证码和过期时间的对象
  const codeData = {
    code: code,
    expiresAt: Date.now() + expireTime * 1000 // 当前时间戳 + 有效期(毫秒)
  };
  // 将验证码信息存入 session (或 Redis 等数据库)
  req.session.verificationCode = codeData;
  console.log(`验证码 ${code} 已发送给 ${phoneNumber},有效期 ${expireTime} 秒`);
  // 模拟发送短信...
  res.json({ success: true, message: '验证码已发送' });
});
// 验证验证码的 API
app.post('/api/verify-code', (req, res) => {
  const { phone, code } = req.body;
  const storedCodeData = req.session.verificationCode;
  if (!storedCodeData) {
    return res.status(400).json({ success: false, message: '请先获取验证码' });
  }
  // --- 关键部分:检查是否过期 ---
  if (Date.now() > storedCodeData.expiresAt) {
    // 验证码已过期,清除 session
    req.session.verificationCode = null;
    return res.status(400).json({ success: false, message: '验证码已过期,请重新获取' });
  }
  if (storedCodeData.code === code) {
    // 验证成功,清除 session
    req.session.verificationCode = null;
    return res.json({ success: false, message: '验证成功' });
  } else {
    return res.status(400).json({ success: false, message: '验证码错误' });
  }
});
app.listen(3000, () => console.log('Server running on port 3000'));
如何修改有效期?
(图片来源网络,侵删)
只需修改 expireTime 这个变量的值即可。
- 想改成1分钟?
const expireTime = 60; - 想改成10分钟?
const expireTime = 600; - 加入随机性? 你可以在这个基础上加一个随机数,比如有效期在 4 到 6 分钟之间:
const baseExpireTime = 300; // 5分钟
const randomOffset = Math.floor(Math.random() * 120) - 60; // -60 到 +60 秒的随机偏移
const expireTime = baseExpireTime + randomOffset; // 最终有效期在 240 到 360 秒之间
修改发送验证码后的冷却时间
这是指用户点击“发送验证码”按钮后,按钮会进入倒计时状态(例如60秒),倒计时结束前不能再次点击,这通常用于防止用户恶意频繁请求。
这个逻辑完全在前端实现。
前端实现 (原生 JavaScript)
<!DOCTYPE html>
<html lang="zh-CN">
<head>
    <meta charset="UTF-8">验证码示例</title>
    <style>
        body { font-family: sans-serif; display: flex; justify-content: center; align-items: center; height: 100vh; }
        .container { text-align: center; }
        input { padding: 10px; margin: 10px; width: 200px; }
        button { padding: 10px 20px; cursor: pointer; }
        button:disabled { background-color: #ccc; cursor: not-allowed; }
    </style>
</head>
<body>
    <div class="container">
        <h2>手机号验证</h2>
        <input type="text" id="phone" placeholder="请输入手机号">
        <br>
        <button id="sendCodeBtn">发送验证码</button>
        <br>
        <input type="text" id="code" placeholder="请输入收到的验证码">
        <button id="verifyBtn">验证</button>
    </div>
    <script>
        const sendCodeBtn = document.getElementById('sendCodeBtn');
        const phoneInput = document.getElementById('phone');
        const verifyBtn = document.getElementById('verifyBtn');
        let countdownInterval;
        sendCodeBtn.addEventListener('click', function() {
            const phoneNumber = phoneInput.value.trim();
            if (!/^1[3-9]\d{9}$/.test(phoneNumber)) {
                alert('请输入正确的手机号');
                return;
            }
            // --- 关键部分:设置冷却时间 ---
            // 基础冷却时间 60 秒
            const baseCooldownTime = 60;
            // 随机偏移 -10 到 +10 秒
            const randomOffset = Math.floor(Math.random() * 21) - 10;
            // 最终冷却时间
            const cooldownTime = baseCooldownTime + randomOffset;
            console.log(`发送验证码,冷却时间设置为 ${cooldownTime} 秒`);
            // 模拟发送请求到后端
            // fetch('/api/send-code', { method: 'POST', body: JSON.stringify({ phone: phoneNumber }) })
            //     .then(response => response.json())
            //     .then(data => console.log(data));
            // 禁用按钮
            sendCodeBtn.disabled = true;
            let remainingTime = cooldownTime;
            // 更新按钮文本
            countdownInterval = setInterval(() => {
                sendCodeBtn.textContent = `重新发送 (${remainingTime}s)`;
                remainingTime--;
                if (remainingTime < 0) {
                    clearInterval(countdownInterval);
                    sendCodeBtn.disabled = false;
                    sendCodeBtn.textContent = '发送验证码';
                }
            }, 1000);
        });
        verifyBtn.addEventListener('click', () => {
            const code = document.getElementById('code').value;
            if (code) {
                alert('验证逻辑应在此处调用后端API');
                // fetch('/api/verify-code', { method: 'POST', body: JSON.stringify({ phone: phoneInput.value, code: code }) })
                //     .then(response => response.json())
                //     .then(data => alert(data.message));
            } else {
                alert('请输入验证码');
            }
        });
    </script>
</body>
</html>
如何修改冷却时间?

(图片来源网络,侵删)
只需修改 baseCooldownTime 和 randomOffset 的值即可。
- 想改成30秒?
const baseCooldownTime = 30; - 想改成2分钟(120秒)?
const baseCooldownTime = 120; - 调整随机范围?
- 当前是
Math.random() * 21) - 10,即-10到+10秒。 - 想改成
-5到+5秒?const randomOffset = Math.floor(Math.random() * 11) - 5; - 想去掉随机性,固定60秒?直接注释掉或删除
const randomOffset = ...这一行,const cooldownTime = baseCooldownTime;
- 当前是
| 场景 | 实现位置 | 关键变量 | 如何修改 rand |
|---|---|---|---|
| 验证码有效期 | 后端 | expireTime |
修改基础时间,然后可以加上一个正负随机偏移量。 |
| 发送冷却时间 | 前端 | baseCooldownTime |
修改基础倒计时秒数,然后可以加上一个正负随机偏移量。 |
根据您的具体需求,找到对应的代码段并修改相应的变量值即可。


