WebService 客户端开发全教程
目录
- 第一部分:核心概念
- 什么是 WebService?
- WebService 如何工作?(核心协议:SOAP vs REST)
- 为什么需要客户端?
- 第二部分:准备工作
- 获取 WSDL 或 API 文档
- 开发环境搭建
- 第三部分:Java 客户端开发(最经典)
- 使用 JDK 自带
wsimport工具(传统 SOAP) - 使用 Spring Boot +
RestTemplate/WebClient(现代 REST)
- 使用 JDK 自带
- 第四部分:Python 客户端开发(简洁高效)
- 使用
requests库(最常用 REST) - 使用
zeep库(SOAP)
- 使用
- 第五部分:C# 客户端开发(.NET 生态)
- 使用
HttpClient(现代 REST) - 使用 "添加服务引用"(传统 SOAP)
- 使用
- 第六部分:进阶与最佳实践
- 处理认证(API Key, OAuth, Basic Auth)
- 错误处理与重试机制
- 日志记录
- 使用 API 网关
- 第七部分:总结与资源
第一部分:核心概念
什么是 WebService?
WebService 是一种跨编程语言和跨操作系统平台的远程调用技术,它允许你的应用程序通过网络(通常是 HTTP/HTTPS)调用另一个应用程序的功能,就像调用本地方法一样,它是一种服务提供方暴露功能给服务消费方(客户端)的标准方式。
WebService 如何工作?(核心协议:SOAP vs REST)
WebService 主要有两种主流风格:SOAP 和 REST,理解它们的区别至关重要。
| 特性 | SOAP (Simple Object Access Protocol) | REST (Representational State Transfer) |
|---|---|---|
| 协议 | 严格基于 XML 的协议,本身是标准。 | 一种架构风格,不是标准,更灵活。 |
| 数据格式 | 强制使用 XML。 | 非常灵活,常用 JSON, XML, HTML, Text。 |
| 消息格式 | 包含一个信封、头部和主体,结构严谨。 | 简单的 HTTP 请求(GET, POST, PUT, DELETE)。 |
| 接口定义 | 使用 WSDL (Web Services Description Language) 文件来描述服务接口、方法、参数等。 | 通常使用 OpenAPI (Swagger) 文档来描述 API。 |
| 优点 | - 标准化程度高,语言无关。 - 内置安全、事务支持。 - 结构严谨,易于验证。 |
- 轻量级,简单易用。 - 性能通常更好(JSON 比 XML 小)。 - 无状态,易于扩展和缓存。 |
| 缺点 | - 协议复杂,冗余信息多。 - 开发和调试相对困难。 - 性能开销较大。 |
- 无统一标准,实现方式多样。 - 缺乏内置的可靠性和安全性机制(需自行实现)。 |
| 适用场景 | 企业级应用、金融、电信等对安全性、事务性要求极高的场景。 | 移动 App 后端、Web 应用、微服务、绝大多数现代 API。 |
现在市面上绝大多数新的 WebService 都是 REST 风格,SOAP 主要用于一些遗留的、要求严格的系统,作为客户端开发者,你需要根据服务提供方的文档来判断使用哪种技术。
为什么需要客户端?
客户端是调用远程服务的“发起者”,它负责:
- 定位服务:知道服务的地址(URL)。
- 构造请求:按照服务定义的格式(SOAP XML 或 HTTP 请求)打包你的请求参数。
- 发送请求:通过网络将请求发送到服务器。
- 接收响应:获取服务器返回的数据。
- 解析响应:将返回的 XML 或 JSON 数据转换成你代码中可以使用的对象。
第二部分:准备工作
在写代码之前,你必须拿到两样东西:
-
WSDL 文件(针对 SOAP)或 API 文档(针对 REST)
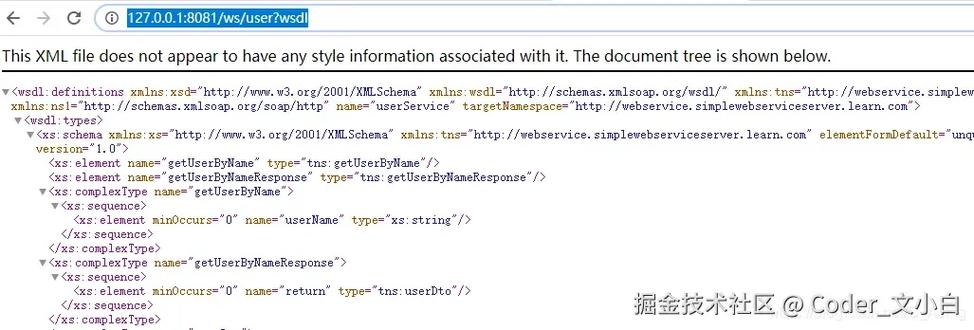
- WSDL:一个
.wsdl结尾的 XML 文件,它就像是服务的“说明书”,详细列出了所有可用的方法(操作)、每个方法的输入参数、输出参数、数据类型、服务地址等,你可以直接在浏览器中打开它查看。 - API 文档:对于 REST 服务,通常是一个 HTML 文件(由 Swagger/OpenAPI 生成)或一份 PDF/Markdown 文档,它会列出所有的 API 端点(如
/users)、HTTP 方法(GET/POST)、请求/响应示例、参数说明等。
- WSDL:一个
-
开发环境
- Java: JDK (推荐 8 或以上), IDE (如 IntelliJ IDEA 或 Eclipse), Maven/Gradle。
- Python: Python 3.x, IDE (如 PyCharm),
pip包管理器。 - C#: .NET SDK (推荐 .NET 5/6/7), IDE (如 Visual Studio 或 VS Code)。
第三部分:Java 客户端开发(最经典)
使用 JDK 自带 wsimport 工具(传统 SOAP)
这是最传统、最标准的 Java 客户端开发方式,适用于任何符合标准的 SOAP 服务。
步骤 1:生成客户端代码
打开你的终端或命令行,进入你的项目目录,执行以下命令:
# -p: 指定生成的包名
# -keep: 保留生成的源文件,方便查看
# -d: 指定编译后的 .class 文件存放目录
wsimport -p com.example.client -keep -d src/main/java http://www.example.com/service?wsdl
执行后,wsimport 工具会根据 WSDL 文件生成一堆 Java 类(包括 Service 类、Port 接口、以及所有请求/响应的 XXX 和 XXXResponse 类)。
步骤 2:在代码中调用生成的客户端
import com.example.client.YourService; // 这是生成的 Service 类
import com.example.client.YourServicePortType; // 这是生成的 Port 接口
import com.example.client.YourRequest; // 这是生成的请求类
import com.example.client.YourResponse; // 这是生成的响应类
public class SoapClientExample {
    public static void main(String[] args) {
        // 1. 创建 Service 实例
        YourService service = new YourService();
        // 2. 获取 Port (端口),即服务的具体实现
        YourServicePortType port = service.getYourServicePort(); // 方法名通常与 WSDL 中的 service name 和 port name 相关
        // 3. 创建请求对象,并设置参数
        YourRequest request = new YourRequest();
        request.setInputParam("Hello, WebService!"); // 设置请求参数
        try {
            // 4. 调用远程方法,传入请求,获取响应
            YourResponse response = port.yourOperationName(request); // yourOperationName 是 WSDL 中定义的操作名
            // 5. 处理响应结果
            System.out.println("调用成功!");
            System.out.println("返回结果: " + response.getOutputParam());
        } catch (Exception e) {
            // 6. 处理异常
            e.printStackTrace();
            System.err.println("调用失败: " + e.getMessage());
        }
    }
}
使用 Spring Boot + RestTemplate/WebClient(现代 REST)
这是目前 Java 开发 REST 客户端最主流的方式。
步骤 1:添加依赖
在你的 pom.xml 中添加 RestTemplate 或 WebClient 的依赖(WebClient 是更现代、非阻塞的选择)。
<!-- 使用 RestTemplate (同步) -->
<dependency>
    <groupId>org.springframework.boot</groupId>
    <artifactId>spring-boot-starter-web</artifactId>
</dependency>
<!-- 或者使用 WebClient (异步) -->
<dependency>
    <groupId>org.springframework.boot</groupId>
    <artifactId>spring-boot-starter-webflux</artifactId>
</dependency>
步骤 2:创建配置类
import org.springframework.context.annotation.Bean;
import org.springframework.context.annotation.Configuration;
import org.springframework.web.client.RestTemplate;
import org.springframework.web.reactive.function.client.WebClient;
@Configuration
public class ClientConfig {
    // 创建 RestTemplate Bean
    @Bean
    public RestTemplate restTemplate() {
        return new RestTemplate();
    }
    // 创建 WebClient Bean
    @Bean
    public WebClient webClient() {
        return WebClient.builder()
                .baseUrl("http://www.example.com/api") // 设置基础 URL
                .build();
    }
}
步骤 3:编写服务类进行调用
import org.springframework.beans.factory.annotation.Autowired;
import org.springframework.stereotype.Service;
import org.springframework.web.client.RestTemplate;
@Service
public class MyRestService {
    @Autowired
    private RestTemplate restTemplate;
    // 定义 API 的 URL
    private static final String API_URL = "http://www.example.com/api/users/{id}";
    public User getUserById(Long id) {
        // RestTemplate 会自动将 URL 中的 {id} 替换为方法参数 id
        // 并将返回的 JSON 自动映射为 User 对象
        User user = restTemplate.getForObject(API_URL, User.class, id);
        return user;
    }
}
// 假设有一个 User 类来映射 JSON 响应
class User {
    private long id;
    private String name;
    private String email;
    // Getters and Setters...
}
第四部分:Python 客户端开发(简洁高效)
Python 因其简洁的语法和强大的库,成为开发 API 客户端的理想选择。
使用 requests 库(最常用 REST)
requests 是 Python 中事实上的标准 HTTP 库。
步骤 1:安装 requests
pip install requests
步骤 2:编写调用代码
import requests
import json
# API 的 URL
url = "http://www.example.com/api/users/1"
# 请求头,可以指定接受 JSON 格式的响应
headers = {
    "Accept": "application/json"
}
try:
    # 发送 GET 请求
    response = requests.get(url, headers=headers)
    # 检查请求是否成功 (状态码 200-299)
    response.raise_for_status()  # 如果状态码不是 2xx,则抛出异常
    # 解析 JSON 响应
    user_data = response.json()
    # 打印结果
    print(f"用户 ID: {user_data['id']}")
    print(f"用户名: {user_data['name']}")
except requests.exceptions.HTTPError as http_err:
    print(f"HTTP 错误发生: {http_err}")
except requests.exceptions.ConnectionError as conn_err:
    print(f"连接错误发生: {conn_err}")
except requests.exceptions.Timeout as timeout_err:
    print(f"请求超时: {timeout_err}")
except requests.exceptions.RequestException as err:
    print(f"发生未知错误: {err}")
使用 zeep 库(SOAP)
zeep 是 Python 中一个功能强大且易用的 SOAP 客户端库。
步骤 1:安装 zeep
pip install zeep
步骤 2:编写调用代码
from zeep import Client
from zeep.exceptions import Fault
# WSDL 文件的 URL
wsdl_url = "http://www.example.com/service?wsdl"
try:
    # 1. 创建客户端
    client = Client(wsdl_url)
    # 2. 查看服务信息 (可选)
    print(client.wsdl.dump())
    # 3. 调用服务方法
    # 方法名和参数名需要根据 WSDL 文件来确定
    # 假设 WSDL 中有一个名为 'YourOperation' 的方法,需要一个 'inputParam' 参数
    response = service.YourOperation(inputParam="Hello from Python!")
    # 4. 打印结果
    # 结果的结构也需要根据 WSDL 来确定
    print("调用成功!")
    print(f"返回结果: {response['outputParam']}")
except Fault as fault:
    print(f"SOAP 错误发生: {fault.message}")
except Exception as e:
    print(f"发生错误: {e}")
第五部分:C# 客户端开发(.NET 生态)
使用 HttpClient(现代 REST)
HttpClient 是 .NET 中用于发送 HTTP 请求的标准类。
步骤 1:创建控制台应用
dotnet new console -name MyRestClient
cd MyRestClient
步骤 2:编写调用代码
using System;
using System.Net.Http;
using System.Text;
using System.Text.Json;
using System.Threading.Tasks;
public class User
{
    public long Id { get; set; }
    public string Name { get; set; }
    public string Email { get; set; }
}
class Program
{
    // 使用 static HttpClient 是最佳实践,避免端口耗尽
    private static readonly HttpClient client = new HttpClient();
    static async Task Main(string[] args)
    {
        // API 的 URL
        string apiUrl = "http://www.example.com/api/users/1";
        try
        {
            // 发送 GET 请求
            HttpResponseMessage response = await client.GetAsync(apiUrl);
            // 确保请求成功
            response.EnsureSuccessStatusCode();
            // 读取响应内容
            string responseBody = await response.Content.ReadAsStringAsync();
            // 使用 System.Text.Json 解析 JSON
            var user = JsonSerializer.Deserialize<User>(responseBody);
            // 打印结果
            Console.WriteLine($"用户 ID: {user.Id}");
            Console.WriteLine($"用户名: {user.Name}");
        }
        catch (HttpRequestException e)
        {
            Console.WriteLine($"请求错误: {e.Message}");
        }
        catch (Exception e)
        {
            Console.WriteLine($"发生错误: {e.Message}");
        }
    }
}
使用 "添加服务引用"(传统 SOAP)
这是 Visual Studio 为 SOAP 服务提供的可视化工具,非常方便。
步骤 1:在 Visual Studio 中操作
- 在“解决方案资源管理器”中,右键点击你的项目 -> “添加” -> “服务引用...”。
- 在弹出的窗口中,输入 WSDL 文件的 URL,然后点击“前往”。
- VS 会自动发现服务,并列出所有可用的服务操作。
- 为命名空间指定一个名称(如
MyServiceReference),然后点击“确定”。
步骤 2:编写调用代码
VS 会自动生成一个客户端代理类,你只需要使用它即可。
using System;
using MyClient.MyServiceReference; // 这是你在上一步中指定的命名空间
class Program
{
    static void Main(string[] args)
    {
        // 1. 创建客户端代理类的实例
        var client = new MyServiceClient();
        try
        {
            // 2. 调用服务方法
            // 方法名和参数根据 WSDL 生成
            YourResponse response = client.YourOperation(new YourRequest { InputParam = "Hello from C#!" });
            // 3. 处理结果
            Console.WriteLine("调用成功!");
            Console.WriteLine($"返回结果: {response.OutputParam}");
        }
        catch (Exception ex)
        {
            Console.WriteLine($"调用失败: {ex.Message}");
        }
        finally
        {
            // 4. 关闭客户端连接
            client.Close();
        }
    }
}
第六部分:进阶与最佳实践
-
处理认证
- API Key: 通常在请求头中添加,如
X-API-Key: your_api_key。 - Bearer Token (JWT): 在请求头中添加
Authorization: Bearer <your_token>。 - Basic Auth: 在请求头中添加
Authorization: Basic <base64_encoded_username:password>。 - OAuth 2.0: 流程最复杂,通常需要先获取
access_token,然后在后续请求中像 Bearer Token 一样使用。
- API Key: 通常在请求头中添加,如
-
错误处理与重试机制
- 错误处理:永远不要假设请求会成功,始终检查 HTTP 状态码(如 200, 404, 500)并捕获网络异常。
- 重试机制:对于网络抖动或临时性服务器错误(如 5xx 状态码),可以实现自动重试逻辑,可以使用
Polly(C#),tenacity(Python) 等库。
-
日志记录
- 记录你发送的请求内容和收到的响应内容,对于调试至关重要,可以使用
log4j(Java),logging(Python),Serilog(C#) 等日志框架。
- 记录你发送的请求内容和收到的响应内容,对于调试至关重要,可以使用
-
使用 API 网关
对于复杂的系统,不要让客户端直接调用后端服务,使用 API 网关(如 Kong, Apigee, AWS API Gateway)作为统一入口,它可以处理认证、限流、日志、路由等所有横切关注点。
第七部分:总结与资源
| 技术 | 场景 | 推荐工具/库 | |
|---|---|---|---|
| Java | 传统 SOAP | wsimport |
WSDL, Port, Service |
| 现代 REST | RestTemplate, WebClient |
@RestController, JSON, @RequestBody |
|
| Python | REST | requests |
get(), post(), response.json() |
| SOAP | zeep |
Client(), WSDL, service.Operation() |
|
| C# | REST | HttpClient |
async/await, HttpResponseMessage, EnsureSuccessStatusCode() |
| SOAP | "添加服务引用" | ServiceClient, 代理类, Add Service Reference |
推荐资源:
- Postman: 一个强大的 API 测试工具,在开发客户端之前,先用它来测试和熟悉你的 API,事半功倍。
- SOAP UI: 专门用于测试 SOAP 服务的工具。
- Swagger Editor: 在线编辑和测试 OpenAPI (Swagger) 文档的工具。
希望这份详尽的教程能帮助你顺利上手 WebService 客户端开发!祝你编码愉快!


