- 设计构思:确定登录界面的布局和样式。
- 创建HTML结构:使用DW的可视化视图和代码视图来搭建登录框的骨架。
- 添加CSS样式:使用DW的“CSS设计器”面板来美化登录界面,使其现代化。
- 添加JavaScript交互:增加基本的输入验证和提交反馈。
- 完整代码:提供可以直接使用的完整HTML和CSS代码。
第一步:设计构思
一个现代、简洁的登录界面通常包含以下元素:
(图片来源网络,侵删)
- 一个居中的登录框:这是界面的核心。
- Logo/标题:显示网站或应用的名称。
- 用户名/邮箱输入框:用于输入登录凭证。
- 密码输入框:用于输入密码,通常有“显示/隐藏密码”功能。
- “记住我”复选框:提供便利性。
- “登录”按钮:触发表单提交。
- 链接:如“忘记密码?”或“立即注册”。
我们将采用一个流行的居中卡片式设计,背景使用柔和的渐变色,整体风格简洁、专业。
第二步:创建HTML结构
-
新建HTML文件:
- 打开 Dreamweaver。
- 选择
文件 > 新建。 - 在“新建文档”窗口中,选择“HTML” >
HTML5,然后点击“创建”。
-
构建登录框的HTML:
- 切换到 代码视图,或者直接在 实时视图 中拖拽元素。
- 我们将使用
<div>作为登录框的容器,并使用HTML5的表单元素。
在
<body>标签内,输入以下HTML代码: (图片来源网络,侵删)
<body> <div class="login-container"> <div class="login-box"> <h2>用户登录</h2> <form action="#" method="post" id="loginForm"> <div class="input-group"> <label for="username">用户名</label> <input type="text" id="username" name="username" required> </div> <div class="input-group"> <label for="password">密码</label> <input type="password" id="password" name="password" required> <span class="password-toggle">👁️</span> </div> <div class="options"> <label class="remember-me"> <input type="checkbox" name="remember"> <span>记住我</span> </label> <a href="#" class="forgot-password">忘记密码?</a> </div> <button type="submit" class="login-btn">登录</button> </form> </div> </div> </body>- 代码解释:
.login-container: 一个全屏的容器,用于将登录框居中。.login-box: 实际的登录卡片。<form>: 表单元素,action="#"是一个占位符,实际开发中应指向后端登录接口。method="post"表示使用POST方法提交数据。<label>和<input>: 为每个输入框提供标签和输入域。required属性确保用户必须填写。.password-toggle: 用于显示/隐藏密码的图标。.options: 包含“记住我”和“忘记密码”的容器。.login-btn: 登录按钮。
第三步:添加CSS样式(使用DW的CSS设计器)
-
打开CSS设计器:
- 在DW右侧面板中,找到并点击 “CSS设计器”。
-
创建新CSS规则:
- 在CSS设计器中,点击 号选择 “创建新的CSS规则”。
- 选择器类型:选择 “类”。
- 选择器名称:输入
.login-container。 - 定义在:选择“新建CSS文件”,并给文件命名(
style.css),然后点击“确定”。
-
为
.login-container添加样式:- 在CSS设计器的 “属性” 区域,设置以下属性:
- Box: 设置
Width为100%。 - Background: 点击 号,选择
Gradient,创建一个从#f5f7fa到c3cfe2的线性渐变。 - Layout: 设置
Display为Flex,设置Justify-content为Center,Align-items为Center,设置Min-height为100vh(视口高度)。
- Box: 设置
- 在CSS设计器的 “属性” 区域,设置以下属性:
-
创建并样式化
.login-box: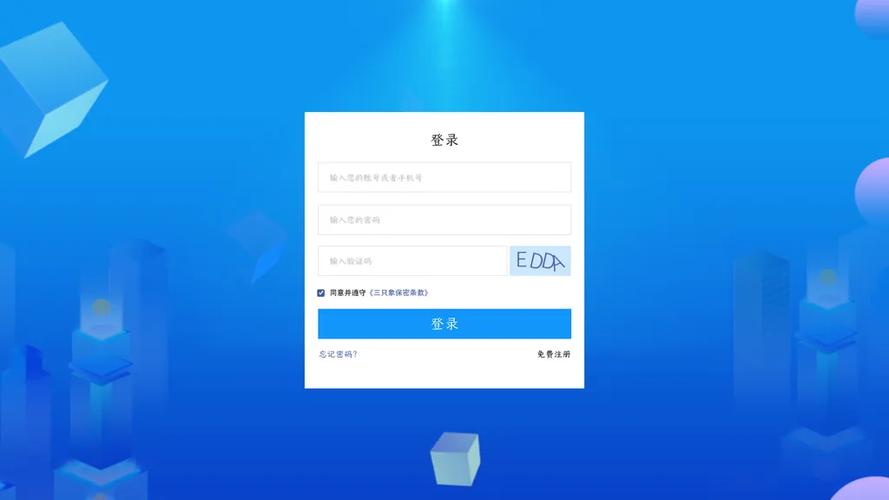 (图片来源网络,侵删)
- 再次点击 号创建新规则,选择器名称为
.login-box。 - 在 “属性” 区域设置:
- Box: 设置
Width为400px,设置Padding为40px 30px,设置Background为白色 (#ffffff),添加一个Box-shadow(0px 5px 15px rgba(0,0,0,0.1))。 - Type: 设置
Text-align为Center。
- Box: 设置
- 再次点击 号创建新规则,选择器名称为
-
创建并样式化
h2和form:h2:- 选择器名称:
.login-box h2 - Type: 设置
Font-family(如 'Helvetica Neue', sans-serif),Font-size为24px,Color为#333,Margin-bottom为25px。
- 选择器名称:
form:- 选择器名称:
.login-box form - Box: 设置
Width为100%。
- 选择器名称:
-
创建并样式化
.input-group:- 选择器名称:
.input-group - Box: 设置
Margin-bottom为20px,设置Text-align为Left。
- 选择器名称:
-
创建并样式化
label和input:label:- 选择器名称:
.input-group label - Type: 设置
Font-size为14px,Color为#555,Display为block,Margin-bottom为8px。
- 选择器名称:
input[type="text"], input[type="password"]:- 选择器名称:
.input-group input - Box: 设置
Width为100%,设置Padding为12px 15px,设置Border为1px solid #ddd,设置Border-radius为5px,设置Box-sizing为border-box(这很重要,确保padding不会影响总宽度)。 - Type: 设置
Font-size为16px。 - Hover: 在CSS设计器中,点击
hover伪类,然后设置Border-color为#aaa。
- 选择器名称:
-
创建并样式化
.password-toggle:- 选择器名称:
.password-toggle - Box: 设置
Position为Absolute,设置Right为15px,设置Top为40px(需要微调),设置Cursor为Pointer。
- 选择器名称:
-
创建并样式化
.options:- 选择器名称:
.options - Box: 设置
Display为Flex,设置Justify-content为space-between,设置Align-items为center,设置Margin-bottom为25px。
- 选择器名称:
-
创建并样式化
.remember-me和a:.remember-me:- 选择器名称:
.remember-me - Type: 设置
Font-size为14px,Color为#666,设置cursor为pointer。
- 选择器名称:
.forgot-password:- 选择器名称:
.forgot-password - Type: 设置
Font-size为14px,Color为3498db,Text-decoration为none。 hover: 设置Text-decoration为underline。
- 选择器名称:
-
创建并样式化
.login-btn:- 选择器名称:
.login-btn - Box: 设置
Width为100%,设置Padding为12px,设置Border为none,设置Border-radius为5px,设置Background为3498db,设置Cursor为pointer。 - Type: 设置
Font-size为16px,Font-weight为bold,Color为white。 hover: 设置Background为2980b9。
- 选择器名称:
你的实时视图中应该已经出现了一个非常漂亮的登录界面了!
第四步:添加JavaScript交互
我们将实现两个小功能:1) 显示/隐藏密码;2) 表单提交时的简单验证。
-
切换到代码视图,在
</body>标签前,添加<script> -
添加显示/隐藏密码功能:
<script> // 密码显示/隐藏功能 const passwordInput = document.getElementById('password'); const passwordToggle = document.querySelector('.password-toggle'); passwordToggle.addEventListener('click', function() { // 切换 input 的 type 属性 const type = passwordInput.getAttribute('type') === 'password' ? 'text' : 'password'; passwordInput.setAttribute('type', type); // 切换图标(这里用简单的文本代替,你也可以用图标字体) this.textContent = type === 'password' ? '👁️' : '🙈'; }); // 表单提交验证 const loginForm = document.getElementById('loginForm'); loginForm.addEventListener('submit', function(event) { const username = document.getElementById('username').value; const password = document.getElementById('password').value; if (username.trim() === '' || password.trim() === '') { // 阻止表单默认提交行为 event.preventDefault(); // 创建一个提示信息 const existingAlert = document.querySelector('.alert-message'); if (existingAlert) { existingAlert.remove(); } const alertDiv = document.createElement('div'); alertDiv.className = 'alert-message'; alertDiv.textContent = '用户名和密码不能为空!'; alertDiv.style.color = 'red'; alertDiv.style.marginBottom = '15px'; this.insertBefore(alertDiv, this.firstChild); } }); </script> -
代码解释:
- 我们通过
getElementById和querySelector获取了DOM元素。 - 为密码图标添加了
click事件监听器,点击时切换input的type属性。 - 为表单添加了
submit事件监听器,在提交前检查用户名和密码是否为空,如果为空,则阻止提交并显示一条错误消息。
- 我们通过
第五步:完整代码(可直接复制使用)
这是完整的 index.html 文件内容,你可以直接在DW中新建一个HTML文件,然后替换全部内容。
<!DOCTYPE html>
<html lang="zh-CN">
<head>
  <meta charset="UTF-8">
  <meta name="viewport" content="width=device-width, initial-scale=1.0">登录页面</title>
  <style>
    /* 基础样式重置 */
    * {
      margin: 0;
      padding: 0;
      box-sizing: border-box;
      font-family: 'Helvetica Neue', 'Microsoft YaHei', sans-serif;
    }
    body {
      background: linear-gradient(135deg, #f5f7fa 0%, #c3cfe2 100%);
      min-height: 100vh;
      display: flex;
      justify-content: center;
      align-items: center;
    }
    /* 登录容器 */
    .login-container {
      width: 100%;
      display: flex;
      justify-content: center;
      align-items: center;
    }
    /* 登录框 */
    .login-box {
      width: 400px;
      padding: 40px 30px;
      background: #ffffff;
      border-radius: 10px;
      box-shadow: 0 5px 15px rgba(0, 0, 0, 0.1);
      text-align: center;
    }
    .login-box h2 {
      font-size: 24px;
      color: #333;
      margin-bottom: 25px;
    }
    /* 输入组 */
    .input-group {
      margin-bottom: 20px;
      text-align: left;
      position: relative; /* 为密码图标定位 */
    }
    .input-group label {
      display: block;
      font-size: 14px;
      color: #555;
      margin-bottom: 8px;
    }
    .input-group input {
      width: 100%;
      padding: 12px 15px;
      font-size: 16px;
      border: 1px solid #ddd;
      border-radius: 5px;
      transition: border-color 0.3s;
    }
    .input-group input:focus {
      outline: none;
      border-color: #3498db;
    }
    /* 密码显示/隐藏图标 */
    .password-toggle {
      position: absolute;
      right: 15px;
      top: 38px; /* 需要根据padding微调 */
      cursor: pointer;
      user-select: none; /* 防止文字被选中 */
    }
    /* 选项区域 */
    .options {
      display: flex;
      justify-content: space-between;
      align-items: center;
      margin-bottom: 25px;
    }
    .remember-me {
      font-size: 14px;
      color: #666;
      cursor: pointer;
    }
    .forgot-password {
      font-size: 14px;
      color: #3498db;
      text-decoration: none;
    }
    .forgot-password:hover {
      text-decoration: underline;
    }
    /* 登录按钮 */
    .login-btn {
      width: 100%;
      padding: 12px;
      font-size: 16px;
      font-weight: bold;
      color: #ffffff;
      background: #3498db;
      border: none;
      border-radius: 5px;
      cursor: pointer;
      transition: background-color 0.3s;
    }
    .login-btn:hover {
      background: #2980b9;
    }
    /* 提示信息样式 */
    .alert-message {
      color: red;
      margin-bottom: 15px;
    }
  </style>
</head>
<body>
  <div class="login-container">
    <div class="login-box">
      <h2>用户登录</h2>
      <form action="#" method="post" id="loginForm">
        <div class="input-group">
          <label for="username">用户名</label>
          <input type="text" id="username" name="username" placeholder="请输入用户名" required>
        </div>
        <div class="input-group">
          <label for="password">密码</label>
          <input type="password" id="password" name="password" placeholder="请输入密码" required>
          <span class="password-toggle">👁️</span>
        </div>
        <div class="options">
          <label class="remember-me">
            <input type="checkbox" name="remember">
            <span>记住我</span>
          </label>
          <a href="#" class="forgot-password">忘记密码?</a>
        </div>
        <button type="submit" class="login-btn">登录</button>
      </form>
    </div>
  </div>
  <script>
    // 密码显示/隐藏功能
    const passwordInput = document.getElementById('password');
    const passwordToggle = document.querySelector('.password-toggle');
    passwordToggle.addEventListener('click', function() {
      const type = passwordInput.getAttribute('type') === 'password' ? 'text' : 'password';
      passwordInput.setAttribute('type', type);
      this.textContent = type === 'password' ? '👁️' : '🙈';
    });
    // 表单提交验证
    const loginForm = document.getElementById('loginForm');
    loginForm.addEventListener('submit', function(event) {
      const username = document.getElementById('username').value;
      const password = document.getElementById('password').value;
      if (username.trim() === '' || password.trim() === '') {
        event.preventDefault();
        const existingAlert = document.querySelector('.alert-message');
        if (existingAlert) {
          existingAlert.remove();
        }
        const alertDiv = document.createElement('div');
        alertDiv.className = 'alert-message';
        alertDiv.textContent = '用户名和密码不能为空!';
        this.insertBefore(alertDiv, this.firstChild);
      }
    });
  </script>
</body>
</html>
总结与扩展
通过以上步骤,你已经成功地使用 Dreamweaver 创建了一个功能完整、样式现代的静态登录界面。
可以进一步扩展的方向:
- 响应式设计:使用媒体查询 (
@media),让登录框在手机等小屏幕设备上也能良好显示。 - 更复杂的验证:使用正则表达式验证用户名格式(如邮箱)和密码强度。
- 连接后端:将
form的action属性指向你的服务器API,使用AJAX或Fetch API处理登录请求,实现真正的用户认证。 - 动画效果:为登录框的显示、输入框的聚焦等添加CSS过渡或动画,提升用户体验。
希望这个详细的教程能帮助你掌握在DW中制作登录界面的核心技巧!


