核心工作原理
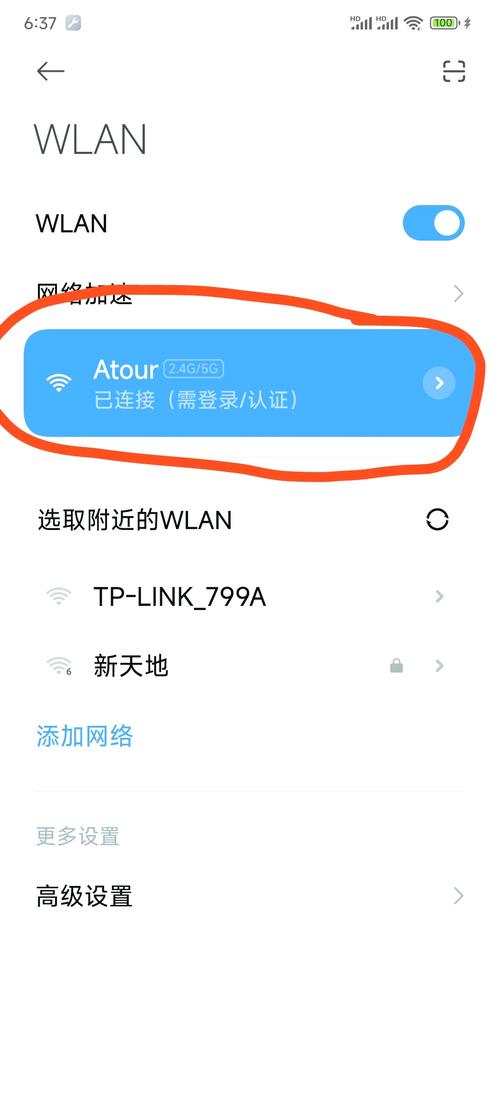
当你连接到一个开启了Captive Portal的WiFi网络时,会发生以下事情:
(图片来源网络,侵删)
- 初始连接:你的设备(手机/电脑)连接到WiFi。
- 重定向:你的设备会自动尝试访问一个公共网站(如
apple.com或captive.apple.com)来测试网络连接,Captive Portal系统会拦截这个请求,并将它重定向到一个自定义的登录页面(http://192.168.1.1/login)。 - 用户认证:用户在登录页面上输入用户名和密码,或者点击“同意”条款。
- 后台验证:你的系统接收到登录请求,验证用户凭证,凭证可以很简单(比如固定的用户名密码),也可以是动态的(如短信验证码、微信扫码等)。
- 放行:验证通过后,系统会做两件事:
- 在会话中标记该设备为“已认证”。
- 通过某种方式(如
iptables防火墙规则)临时允许该设备的网络流量通过。
- 跳转:认证成功后,将用户重定向到他最初想访问的网站,或者一个指定的“欢迎”页面。
技术栈选择
- 后端: Python + Flask,Flask是一个轻量级的Web框架,非常适合快速构建这种小型的应用。
- 前端: HTML + CSS + JavaScript,用于构建登录页面。
- 网络控制:
iptables(Linux系统),这是Linux内核的防火墙工具,我们将用它来实现网络流量的“拦截”和“放行”。 - 设备识别: 使用客户端设备的MAC地址作为唯一标识,这是最简单且常见的方式。
完整源码示例
这个示例包含三个文件:
app.py: Flask后端主程序。templates/login.html: 登录页面模板。templates/success.html: 认证成功页面。
项目结构
wifi-portal/
├── app.py
└── templates/
    ├── login.html
    └── success.html
app.py - 核心逻辑
这是整个系统的核心,负责处理HTTP请求、验证用户、管理会话和控制防火墙。
import os
from flask import Flask, render_template, request, redirect, session, url_for
import subprocess
# --- 配置 ---
# 管理员用户名和密码
ADMIN_USER = "admin"
ADMIN_PASS = "admin123"
# 允许认证通过的网段
ALLOWED_NETWORK = "192.168.1.0/24"
# iptables命令路径
IPTABLES_CMD = "/sbin/iptables"
# 会话密钥,用于加密cookie
SECRET_KEY = os.urandom(24)
# --- 初始化Flask应用 ---
app = Flask(__name__)
app.secret_key = SECRET_KEY
# --- 模拟的已认证设备列表 ---
# 在生产环境中,这个列表应该存储在数据库中,并且有定时任务清理过期的设备
authenticated_macs = set()
# --- 辅助函数:检查设备是否已认证 ---
def is_device_authenticated():
    # 获取客户端的MAC地址
    # 注意:获取MAC地址的方法在不同操作系统和路由器上可能不同
    # 这里是一个简化的示例,实际中可能需要从DHCP租约文件或ARP表中获取
    # 一个更通用的方法是检查会话中是否有'mac'键
    if 'mac' in session:
        return session['mac'] in authenticated_macs
    return False
# --- 辅助函数:通过iptables放行设备 ---
def allow_device_traffic(mac_address):
    try:
        # 清理MAC地址格式,去掉可能的冒号或短横线
        mac_clean = mac_address.replace(':', '').replace('-', '')
        # 添加iptables规则,允许该MAC地址的流量通过
        # 这条规则允许来自该MAC地址的TCP和UDP流量
        subprocess.run([
            IPTABLES_CMD, '-I', 'FORWARD', '-m', 'mac', '--mac-source', mac_address, '-j', 'ACCEPT'
        ], check=True)
        print(f"Allowed traffic for MAC: {mac_address}")
    except subprocess.CalledProcessError as e:
        print(f"Failed to add iptables rule for {mac_address}: {e}")
# --- 辅助函数:通过iptables阻止设备流量 ---
def block_device_traffic(mac_address):
    try:
        mac_clean = mac_address.replace(':', '').replace('-', '')
        # 删除之前添加的规则
        # -D 表示删除
        subprocess.run([
            IPTABLES_CMD, '-D', 'FORWARD', '-m', 'mac', '--mac-source', mac_address, '-j', 'ACCEPT'
        ], check=True)
        print(f"Blocked traffic for MAC: {mac_address}")
    except subprocess.CalledProcessError as e:
        # 规则可能不存在,所以错误是正常的
        print(f"Failed to delete iptables rule for {mac_address} (may not exist): {e}")
# --- 路由:首页 (强制重定向到登录页) ---
@app.route('/')
def index():
    # 如果设备已认证,则显示成功页面
    if is_device_authenticated():
        return redirect(url_for('success'))
    # 否则,重定向到登录页
    return redirect(url_for('login'))
# --- 路由:登录页 ---
@app.route('/login', methods=['GET', 'POST'])
def login():
    # 如果设备已认证,直接跳转到成功页
    if is_device_authenticated():
        return redirect(url_for('success'))
    if request.method == 'POST':
        # --- 简单的认证逻辑 ---
        # 在真实场景中,这里应该连接数据库或调用API验证
        username = request.form.get('username')
        password = request.form.get('password')
        if username == ADMIN_USER and password == ADMIN_PASS:
            # --- 认证成功 ---
            # 1. 获取客户端MAC地址 (这里简化处理)
            # 在实际部署中,你需要一个可靠的方法来获取连接设备的MAC地址
            # 通过解析DHCP租约文件或调用路由器API
            # 这里我们用一个假数据代替,你需要替换成真实逻辑
            # client_mac = get_client_mac_from_request(request) # <--- 你需要实现这个函数
            client_mac = "AA:BB:CC:DD:EE:FF" # <--- 示例MAC地址
            if client_mac:
                # 2. 将MAC地址存入会话和已认证列表
                session['mac'] = client_mac
                authenticated_macs.add(client_mac)
                # 3. 通过iptables放行该设备
                allow_device_traffic(client_mac)
                # 4. 重定向到成功页
                return redirect(url_for('success'))
            else:
                return "无法获取您的设备MAC地址", 400
        else:
            # 认证失败,返回登录页并显示错误信息
            return render_template('login.html', error="用户名或密码错误")
    # GET请求,直接显示登录页
    return render_template('login.html')
# --- 路由:认证成功页 ---
@app.route('/success')
def success():
    if not is_device_authenticated():
        return redirect(url_for('login'))
    return render_template('success.html')
# --- 路由:登出 ---
@app.route('/logout')
def logout():
    if 'mac' in session:
        mac_to_logout = session['mac']
        # 1. 从已认证列表中移除
        authenticated_macs.discard(mac_to_logout)
        # 2. 通过iptables阻止该设备
        block_device_traffic(mac_to_logout)
        # 3. 清除会话
        session.pop('mac', None)
    return redirect(url_for('login'))
# --- 主程序入口 ---
if __name__ == '__main__':
    # 注意:在生产环境中,应该使用 Gunicorn 或 uWSGI 来运行 Flask
    # 并且应该以 root 权限运行,因为需要操作 iptables
    # app.run(host='0.0.0.0', port=80, debug=True)
    print("请以 root 权限运行此脚本以操作 iptables。")
    print("启动服务器...")
    app.run(host='0.0.0.0', port=80, debug=True)
templates/login.html
<!DOCTYPE html>
<html lang="zh-CN">
<head>
    <meta charset="UTF-8">
    <meta name="viewport" content="width=device-width, initial-scale=1.0">WiFi 登录</title>
    <style>
        body { font-family: Arial, sans-serif; background-color: #f4f4f4; display: flex; justify-content: center; align-items: center; height: 100vh; margin: 0; }
        .login-container { background-color: #fff; padding: 20px; border-radius: 8px; box-shadow: 0 2px 10px rgba(0,0,0,0.1); width: 300px; text-align: center; }
        h2 { color: #333; }
        input[type="text"], input[type="password"] { width: calc(100% - 22px); padding: 10px; margin: 10px 0; border: 1px solid #ddd; border-radius: 4px; }
        button { background-color: #007bff; color: white; padding: 10px 20px; border: none; border-radius: 4px; cursor: pointer; width: 100%; font-size: 16px; }
        button:hover { background-color: #0056b3; }
        .error { color: red; margin-top: 10px; }
    </style>
</head>
<body>
    <div class="login-container">
        <h2>欢迎使用 WiFi</h2>
        <p>请输入管理员账号密码以访问互联网。</p>
        {% if error %}
            <p class="error">{{ error }}</p>
        {% endif %}
        <form action="{{ url_for('login') }}" method="post">
            <input type="text" name="username" placeholder="用户名" required>
            <input type="password" name="password" placeholder="密码" required>
            <button type="submit">登录</button>
        </form>
    </div>
</body>
</html>
templates/success.html
<!DOCTYPE html>
<html lang="zh-CN">
<head>
    <meta charset="UTF-8">
    <meta name="viewport" content="width=device-width, initial-scale=1.0">认证成功</title>
    <style>
        body { font-family: Arial, sans-serif; background-color: #e9f7ef; display: flex; justify-content: center; align-items: center; height: 100vh; margin: 0; }
        .success-container { background-color: #fff; padding: 40px; border-radius: 8px; box-shadow: 0 2px 10px rgba(0,0,0,0.1); text-align: center; }
        h1 { color: #28a745; }
        p { color: #666; }
        a { color: #007bff; text-decoration: none; }
        a:hover { text-decoration: underline; }
    </style>
</head>
<body>
    <div class="success-container">
        <h1>认证成功!</h1>
        <p>您现在可以自由访问互联网了。</p>
        <p><a href="{{ url_for('logout') }}">点击这里退出登录</a></p>
    </div>
</body>
</html>
如何运行和部署
重要: 此系统需要操作防火墙(iptables),因此必须以 root 权限运行。
步骤 1: 环境准备
- 安装 Python 和 Flask:
# 对于 Ubuntu/Debian
sudo apt update
sudo apt install python3 python3-pip
sudo pip3 install flask
- 创建项目目录,并将上述三个文件放入其中。
步骤 2: 获取客户端MAC地址(关键步骤)
app.py 中的 get_client_mac_from_request 是一个占位符,你需要实现它,这通常是最复杂的一步,因为获取MAC地址没有标准化的HTTP方法。
(图片来源网络,侵删)
通过解析DHCP租约文件(如果路由器和AP在同一台机器上) 如果你的Flask应用直接运行在连接WiFi的路由器上(例如使用OpenWrt或pfSense),你可以解析DHCP服务的租约文件来获取IP和MAC的对应关系。
通过ARP表
你可以从系统的ARP缓存中查找请求来源IP对应的MAC地址,但这需要 root 权限,并且可能不完全可靠。
你可以在 app.py 中添加如下函数(作为示例,需要根据实际情况调整):
# 在 app.py 中添加此函数
import re
def get_client_mac_from_request(request):
    # 获取客户端的IP地址
    client_ip = request.remote_addr
    if not client_ip:
        return None
    try:
        # 执行 arp 命令查找IP对应的MAC
        # 注意:这个命令的输出格式可能因系统而异
        result = subprocess.run(['arp', '-n', client_ip], capture_output=True, text=True, check=True)
        # 示例输出: '192.168.1.100 ether aa:bb:cc:dd:ee:ff C eth0'
        # 使用正则表达式提取MAC地址
        match = re.search(r'(([0-9a-fA-F]{2}[:-]){5}([0-9a-fA-F]{2}))', result.stdout)
        if match:
            return match.group(1)
    except (subprocess.CalledProcessError, FileNotFoundError):
        pass
    return None
# 然后在 login 路由中替换掉 client_mac = "AA:BB:CC:DD:EE:FF"
# 改为:
# client_mac = get_client_mac_from_request(request)
步骤 3: 配置网络路由/防火墙
要让重定向生效,你的路由器或网关需要将所有HTTP/HTTPS流量(端口80和443)转发到运行这个Flask应用的机器上。
(图片来源网络,侵删)
使用 iptables 进行透明代理(重定向)
在运行Flask应用的机器上(假设其IP为 168.1.10),执行以下命令:
# 1. 清空现有的规则(谨慎操作)
iptables -F
iptables -t nat -F
iptables -X
# 2. 允许已建立的连接和本地回环
iptables -A INPUT -m conntrack --ctstate RELATED,ESTABLISHED -j ACCEPT
iptables -A INPUT -i lo -j ACCEPT
# 3. 这是最关键的一步:将所有进入的HTTP流量(80端口)重定向到本地80端口
#    这样,无论用户访问哪个网站,都会被导向我们的Flask应用
iptables -t nat -A PREROUTING -p tcp --dport 80 -j DNAT --to-destination 192.168.1.10:80
# 4. 允许访问本地Flask应用的80端口
iptables -A INPUT -p tcp -d 192.168.1.10 --dport 80 -j ACCEPT
# 5. 默认策略:阻止所有 FORWARD 链的流量
#    这意味着,任何设备在未认证前,其流量都会被这里阻止
iptables -P FORWARD DROP
注意:iptables 规则在重启后会丢失,你可以使用 iptables-persistent (Debian/Ubuntu) 或 firewalld (CentOS/RHEL) 来保存规则。
步骤 4: 运行应用
- 确保你已经在
app.py中实现了获取MAC地址的逻辑。 - 切换到项目目录。
- 以
root权限运行:sudo python3 app.py
- 当任何设备连接到这个WiFi网络时,尝试打开任何网页,都会被重定向到你的
/login页面。
生产环境改进建议
这个示例是一个基础框架,在生产环境中你需要考虑以下几点:
-
用户认证:
- 预付费/时长卡:用户购买时长,输入卡号和密码。
- 短信验证:用户输入手机号,系统发送验证码。
- 微信/支付宝扫码:生成二维码,用户扫码完成支付或登录。
- OAuth2.0:允许用户使用微信、微博等第三方账号登录。
-
数据持久化:
- 使用
SQLite、MySQL或PostgreSQL数据库来存储用户信息、设备认证记录、套餐时长等,而不是使用内存中的set()。
- 使用
-
设备管理:
- 管理员界面,可以查看在线设备、强制下线设备、管理用户账户。
- 实现认证会话的过期机制(例如2小时后自动下线)。
-
安全:
- HTTPS:登录页面必须使用HTTPS,防止密码被窃听,你可以使用
Let's Encrypt免费证书。 - 防止绕过:确保重定向逻辑足够健壮,防止用户通过某些方式绕过认证页面。
- 输入验证:对所有用户输入进行严格的验证和清理,防止SQL注入等攻击。
- HTTPS:登录页面必须使用HTTPS,防止密码被窃听,你可以使用
-
部署:
- 使用
Gunicorn或uWSGI作为WSGI服务器,而不是开发用的Flask服务器。 - 使用
Nginx作为反向代理和负载均衡器,同时处理SSL termination。 - 将应用部署在
Docker容器中,方便管理和移植。
- 使用


