目录
- 第一步:准备工作 - HTML 和 CSS 结构
- 创建基本 HTML 结构
- 编写 CSS 样式
- 第二步:核心 JavaScript 逻辑
- 获取 DOM 元素
- 实现自动播放功能
- 实现手动切换功能(上一张/下一张按钮)
- 实现指示器(小圆点)点击切换
- 第三步:优化与增强
- 添加过渡动画
- 修复常见 Bug(如快速点击)
- 添加触摸滑动支持(高级)
- 第四步:完整代码与总结
- 整合所有代码
- 总结实现思路
第一步:准备工作 - HTML 和 CSS 结构
我们需要一个清晰的 HTML 结构来容纳轮播图的所有部分:图片容器、图片、控制按钮(上一张/下一张)和指示器。
(图片来源网络,侵删)
HTML 结构
我们将使用一个外部的 carousel 容器,内部包含:
.carousel-inner: 一个用于包裹所有图片的容器,我们将通过移动这个容器来实现切换效果。.carousel-item: 每一张图片的包裹元素。.carousel-control: 上一张和下一张的控制按钮。.carousel-indicators: 底部的小圆点指示器。
<!DOCTYPE html>
<html lang="zh-CN">
<head>
<meta charset="UTF-8">
<meta name="viewport" content="width=device-width, initial-scale=1.0">JavaScript 轮播图教程</title>
<link rel="stylesheet" href="style.css">
</head>
<body>
<div class="carousel">
<!-- 图片容器 -->
<div class="carousel-inner">
<div class="carousel-item active">
<img src="https://picsum.photos/seed/slide1/800/400.jpg" alt="Slide 1">
</div>
<div class="carousel-item">
<img src="https://picsum.photos/seed/slide2/800/400.jpg" alt="Slide 2">
</div>
<div class="carousel-item">
<img src="https://picsum.photos/seed/slide3/800/400.jpg" alt="Slide 3">
</div>
<div class="carousel-item">
<img src="https://picsum.photos/seed/slide4/800/400.jpg" alt="Slide 4">
</div>
</div>
<!-- 控制按钮 -->
<button class="carousel-control prev">❮</button>
<button class="carousel-control next">❯</button>
<!-- 指示器 -->
<div class="carousel-indicators">
<span class="indicator active" data-index="0"></span>
<span class="indicator" data-index="1"></span>
<span class="indicator" data-index="2"></span>
<span class="indicator" data-index="3"></span>
</div>
</div>
<script src="script.js"></script>
</body>
</html>
CSS 样式
CSS 的核心思想是:
- 隐藏非活动图片:默认只显示
active的图片。 - 使用 Flexbox 布局:让所有图片
.carousel-item在一行内排列。 - 绝对定位:将
.carousel-inner和控制按钮设置为绝对定位,以便进行位置移动。
/* style.css */
body {
    font-family: Arial, sans-serif;
    display: flex;
    justify-content: center;
    align-items: center;
    height: 100vh;
    margin: 0;
    background-color: #f0f0f0;
}
.carousel {
    position: relative; /* 相对定位,作为内部绝对定位元素的参考 */
    width: 800px;
    height: 400px;
    overflow: hidden; /* 隐藏超出容器的部分,这是实现轮播的关键 */
}
.carousel-inner {
    display: flex; /* 使用 Flexbox 让所有图片在一行 */
    transition: transform 0.5s ease-in-out; /* 添加平滑的过渡效果 */
    height: 100%;
}
.carousel-item {
    min-width: 100%; /* 每张图片占据容器的宽度 */
    height: 100%;
}
.carousel-item img {
    width: 100%;
    height: 100%;
    object-fit: cover; /* 确保图片填充容器且不变形 */
}
/* 控制按钮样式 */
.carousel-control {
    position: absolute;
    top: 50%;
    transform: translateY(-50%);
    background-color: rgba(0, 0, 0, 0.5);
    color: white;
    border: none;
    font-size: 24px;
    padding: 10px 15px;
    cursor: pointer;
    border-radius: 50%;
    z-index: 10;
}
.prev {
    left: 10px;
}
.next {
    right: 10px;
}
.carousel-control:hover {
    background-color: rgba(0, 0, 0, 0.8);
}
/* 指示器样式 */
.carousel-indicators {
    position: absolute;
    bottom: 20px;
    left: 50%;
    transform: translateX(-50%);
    display: flex;
    gap: 10px;
}
.indicator {
    width: 12px;
    height: 12px;
    border-radius: 50%;
    background-color: rgba(255, 255, 255, 0.5);
    cursor: pointer;
}
.indicator.active {
    background-color: white;
}
第二步:核心 JavaScript 逻辑
我们用 JavaScript 来驱动这个轮播图。
获取 DOM 元素
我们需要获取 HTML 中需要操作的元素。
(图片来源网络,侵删)
// script.js
document.addEventListener('DOMContentLoaded', () => {
    const carouselInner = document.querySelector('.carousel-inner');
    const items = document.querySelectorAll('.carousel-item');
    const prevButton = document.querySelector('.prev');
    const nextButton = document.querySelector('.next');
    const indicators = document.querySelectorAll('.indicator');
    let currentIndex = 0; // 当前显示的图片索引
    const totalItems = items.length; // 图片总数
    // ... 后续代码将在这里添加
});
最佳实践:将所有 JavaScript 代码包裹在
DOMContentLoaded事件监听器中,确保在 HTML 文档完全加载和解析后才执行脚本。
实现自动播放功能
自动播放的核心是使用 setInterval 定期调用一个“下一张”的函数。
// ... 在上面的代码块内添加
// 自动播放函数
function goToNextSlide() {
    // 如果是最后一张,则跳转到第一张;否则,索引 + 1
    currentIndex = (currentIndex + 1) % totalItems;
    updateCarousel();
}
// 更新轮播图显示
function updateCarousel() {
    // 1. 移动 .carousel-inner 容器
    // transform: translateX(-${currentIndex * 100}%)
    carouselInner.style.transform = `translateX(-${currentIndex * 100}%)`;
    // 2. 更新指示器的激活状态
    indicators.forEach((indicator, index) => {
        if (index === currentIndex) {
            indicator.classList.add('active');
        } else {
            indicator.classList.remove('active');
        }
    });
}
// 设置自动播放,每3秒切换一次
const autoPlayInterval = setInterval(goToNextSlide, 3000);
实现手动切换功能
为上一张和下一张按钮添加点击事件。
// ... 在上面的代码块内添加
// 上一张按钮点击事件
prevButton.addEventListener('click', () => {
    clearInterval(autoPlayInterval); // 点击时暂停自动播放
    currentIndex = (currentIndex - 1 + totalItems) % totalItems; // 处理索引为负数的情况
    updateCarousel();
});
// 下一张按钮点击事件
nextButton.addEventListener('click', () => {
    clearInterval(autoPlayInterval); // 点击时暂停自动播放
    goToNextSlide(); // 复用之前的函数
});
实现指示器点击切换
为每个小圆点添加点击事件,点击后跳转到对应的图片。
// ... 在上面的代码块内添加
// 指示器点击事件
indicators.forEach(indicator => {
    indicator.addEventListener('click', () => {
        clearInterval(autoPlayInterval); // 点击时暂停自动播放
        // 从 data-index 属性中获取目标索引
        currentIndex = parseInt(indicator.getAttribute('data-index'), 10);
        updateCarousel();
    });
});
第三步:优化与增强
添加过渡动画
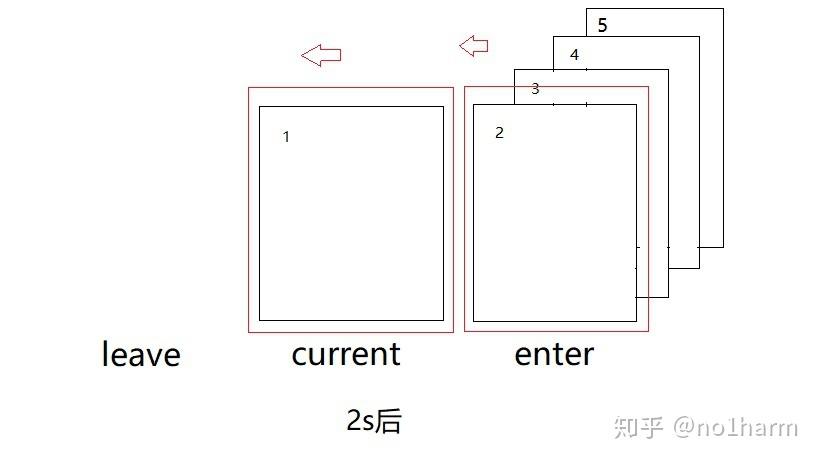
我们已经完成了! 在 CSS 中,我们为 .carousel-inner 添加了 transition: transform 0.5s ease-in-out;,这个 CSS 过渡效果会在 transform 属性(即 translateX 的值)改变时自动生效,从而产生平滑的滑动动画。
修复常见 Bug
当用户快速点击“上一张”或“下一张”按钮时,可能会导致轮播图出现跳动或错乱,一个简单的解决方案是在切换期间禁用按钮,并在动画结束后重新启用。
// script.js - 优化版
// ... (获取元素的代码保持不变)
let currentIndex = 0;
const totalItems = items.length;
let isTransitioning = false; // 添加一个锁,防止在过渡期间重复触发
function goToNextSlide() {
    if (isTransitioning) return; // 如果正在过渡,则直接返回
    isTransitioning = true;
    currentIndex = (currentIndex + 1) % totalItems;
    updateCarousel();
}
function goToPrevSlide() {
    if (isTransitioning) return;
    isTransitioning = true;
    currentIndex = (currentIndex - 1 + totalItems) % totalItems;
    updateCarousel();
}
function updateCarousel() {
    carouselInner.style.transform = `translateX(-${currentIndex * 100}%)`;
    // 更新指示器
    indicators.forEach((indicator, index) => {
        indicator.classList.toggle('active', index === currentIndex);
    });
    // 在过渡结束后,解锁
    // 我们可以监听 transitionend 事件
    carouselInner.addEventListener('transitionend', () => {
        isTransitioning = false;
    }, { once: true }); // { once: true } 确保事件监听器只触发一次
}
// ... (事件监听器代码)
prevButton.addEventListener('click', goToPrevSlide);
nextButton.addEventListener('click', goToNextSlide);
// ... (指示器事件监听器代码)
添加触摸滑动支持(高级)
这需要处理 touchstart, touchmove, 和 touchend 事件。
// ... 在 script.js 中添加触摸逻辑
let startX = 0;
let endX = 0;
carouselInner.addEventListener('touchstart', (e) => {
    startX = e.touches[0].clientX;
    clearInterval(autoPlayInterval); // 触摸时暂停自动播放
}, { passive: true });
carouselInner.addEventListener('touchmove', (e) => {
    // 可以在这里添加一些拖动时的视觉反馈,比如轻微移动图片
}, { passive: true });
carouselInner.addEventListener('touchend', (e) => {
    endX = e.changedTouches[0].clientX;
    const diff = startX - endX;
    // 如果滑动距离足够大(比如超过50px),则切换图片
    if (diff > 50) {
        goToNextSlide(); // 向左滑动,显示下一张
    } else if (diff < -50) {
        goToPrevSlide(); // 向右滑动,显示上一张
    } else {
        // 滑动距离不足,回到当前图片
        updateCarousel();
    }
    // 重新启动自动播放(可选)
    // autoPlayInterval = setInterval(goToNextSlide, 3000);
});
第四步:完整代码与总结
完整 script.js 代码
document.addEventListener('DOMContentLoaded', () => {
    const carouselInner = document.querySelector('.carousel-inner');
    const items = document.querySelectorAll('.carousel-item');
    const prevButton = document.querySelector('.prev');
    const nextButton = document.querySelector('.next');
    const indicators = document.querySelectorAll('.indicator');
    let currentIndex = 0;
    const totalItems = items.length;
    let isTransitioning = false;
    let autoPlayInterval = setInterval(goToNextSlide, 3000);
    // --- 核心函数 ---
    function goToNextSlide() {
        if (isTransitioning) return;
        isTransitioning = true;
        currentIndex = (currentIndex + 1) % totalItems;
        updateCarousel();
    }
    function goToPrevSlide() {
        if (isTransitioning) return;
        isTransitioning = true;
        currentIndex = (currentIndex - 1 + totalItems) % totalItems;
        updateCarousel();
    }
    function updateCarousel() {
        carouselInner.style.transform = `translateX(-${currentIndex * 100}%)`;
        indicators.forEach((indicator, index) => {
            indicator.classList.toggle('active', index === currentIndex);
        });
        carouselInner.addEventListener('transitionend', () => {
            isTransitioning = false;
        }, { once: true });
    }
    // --- 事件监听器 ---
    prevButton.addEventListener('click', () => {
        clearInterval(autoPlayInterval);
        goToPrevSlide();
    });
    nextButton.addEventListener('click', () => {
        clearInterval(autoPlayInterval);
        goToNextSlide();
    });
    indicators.forEach(indicator => {
        indicator.addEventListener('click', () => {
            clearInterval(autoPlayInterval);
            currentIndex = parseInt(indicator.getAttribute('data-index'), 10);
            updateCarousel();
        });
    });
    // --- 触摸事件 ---
    let startX = 0;
    let endX = 0;
    carouselInner.addEventListener('touchstart', (e) => {
        startX = e.touches[0].clientX;
        clearInterval(autoPlayInterval);
    }, { passive: true });
    carouselInner.addEventListener('touchend', (e) => {
        endX = e.changedTouches[0].clientX;
        const diff = startX - endX;
        if (diff > 50) {
            goToNextSlide();
        } else if (diff < -50) {
            goToPrevSlide();
        } else {
            updateCarousel();
        }
    }, { passive: true });
});
通过这个教程,我们实现了一个功能完善的轮播图,其核心思路可以总结为以下几点:
- 结构先行:设计一个清晰的、符合语义的 HTML 结构。
- CSS 实现“门”:利用
overflow: hidden创建一个“窗口”,只允许一张图片显示。 - JS 实现“拉门”:通过改变
.carousel-inner的transform: translateX()值,来水平移动内部的图片,实现切换效果。 - 状态管理:使用一个
currentIndex变量来追踪当前显示的是哪张图片,所有操作(自动、手动、指示器)都围绕这个变量展开。 - 事件驱动:用户的交互(点击、触摸)通过事件监听器来触发状态更新和视图刷新。
- 优化体验:通过 CSS
transition实现动画,通过 JavaScriptisTransitioning锁防止快速点击 Bug,通过触摸事件增加移动端友好性。
掌握了这个原理,你就可以轻松地修改和扩展这个轮播图,比如添加淡入淡出效果、无限循环滚动、或将其封装成一个可复用的 JavaScript 组件。


